Exploring Tessellations & Op Art: Hidden Arrows

This brief tutorial explores an Op Art tessellation that plays with bistable perception, figure–ground reversal and negative space. By combining modular geometric tiles with contrasting colors, the pattern creates a visual interplay in which arrows can be perceived as either foreground shapes or background forms, depending on how the pattern is interpreted.

Experiment 1:

· Preparation — Fig. A: Start with a 3 × 3 square. Divide it along its diagonals into four triangles, then add a 1 × 1 square to the outer side of each triangle, as shown. Color the resulting cross-shaped tile with two contrasting colors, ensuring that adjacent sections are different colors. The construction produces four inward-pointing arrows.

· Preparation — Fig. B: Following the construction shown, subdivide a 2 × 2 square to create five diamonds arranged in a staggered pattern. Use the same two contrasting colors. This produces a complementary tile containing four outward-pointing arrows.

· Assembly — Fig. C: The two tiles are complementary and fit together. Interlock the cross-shaped tiles with inward-pointing arrows and the square tiles containing the diamond pattern to create a continuous tessellation.
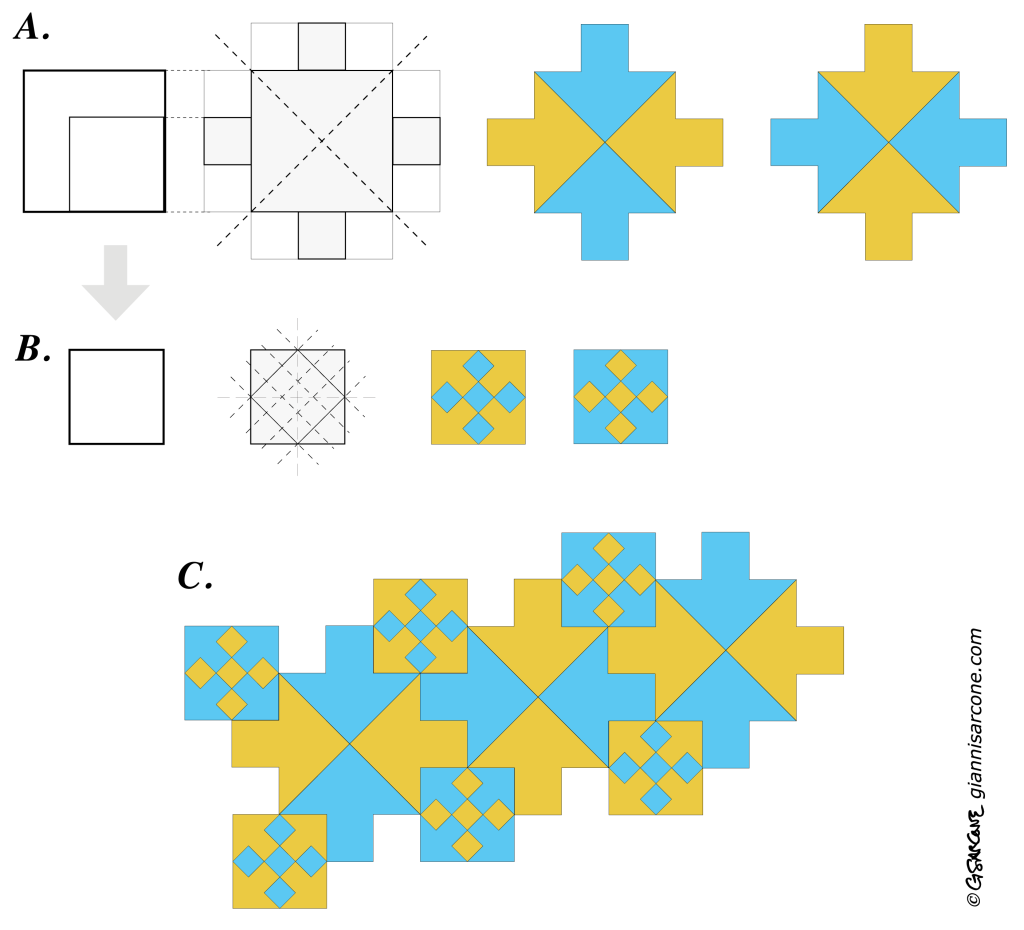
Visual result: The alternating geometric modules form a large geometric Op Art pattern in which arrows emerge through figure–ground reversal. And hidden within it are, believe it or not, 100 arrows. Yes, one hundred arrows!
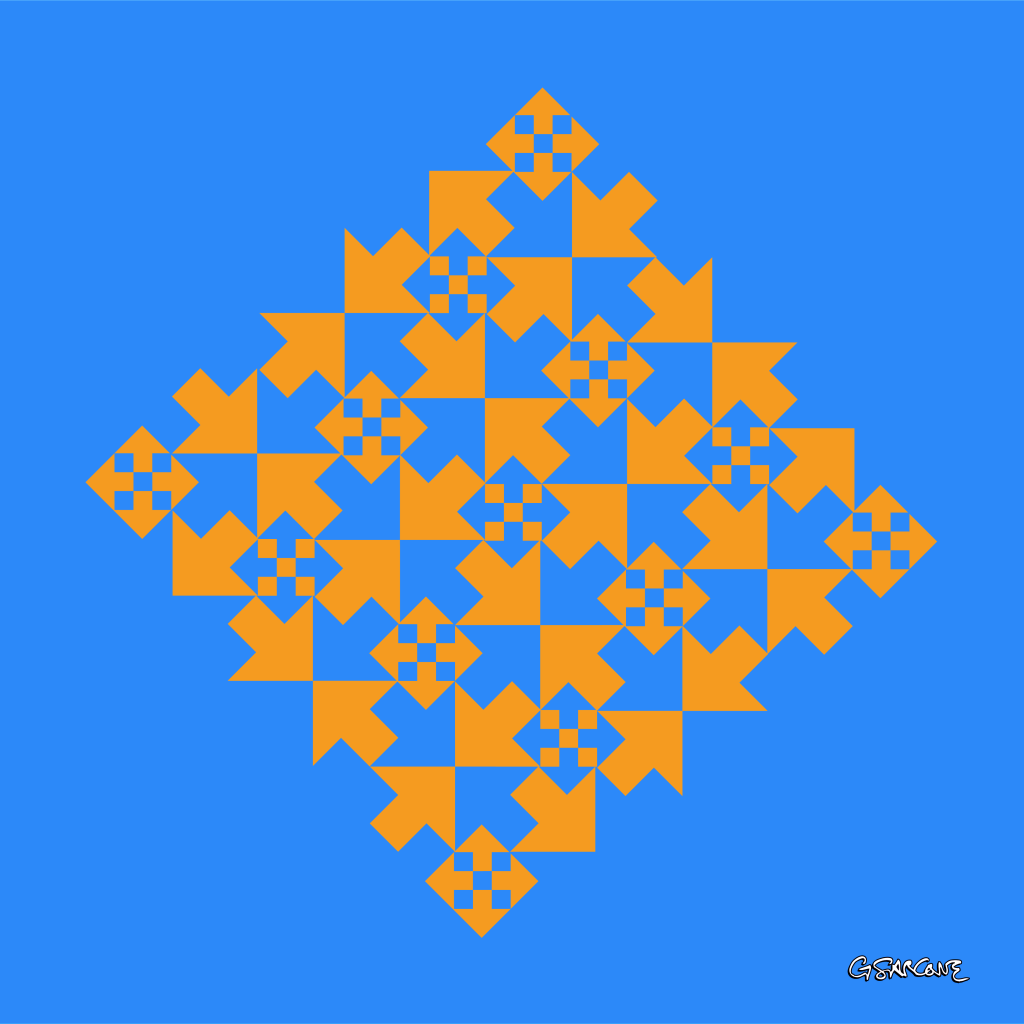
This op art work is available as fine art prints and canvases from my online official gallery.

Experiment 2:

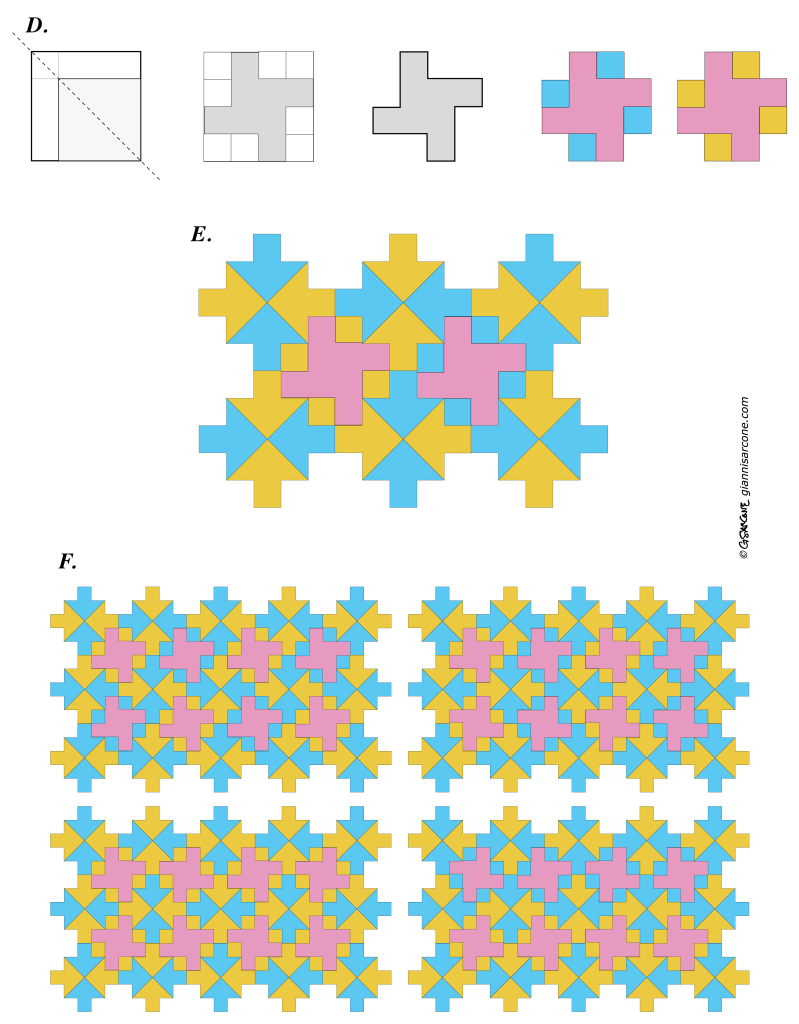
· Preparation — Fig. D: Build a four-armed pinwheel shape from a 4 × 4 square, as shown.

· Assembly — Fig. E: Interlock the four-armed pinwheel shape with the cross-shaped motifs containing the inward-pointing arrows.

· Assembly — Fig. F: As shown, these four-armed pinwheel shapes can be assembled in four or more different ways, producing different geometric configurations.
Visual Result: As seen in the example below, the contrasting colors make the bright blue arrows radiating around the pink central hubs—the pinwheel shapes—stand out, while the yellow arrows, matching the background color, virtually disappear from view.
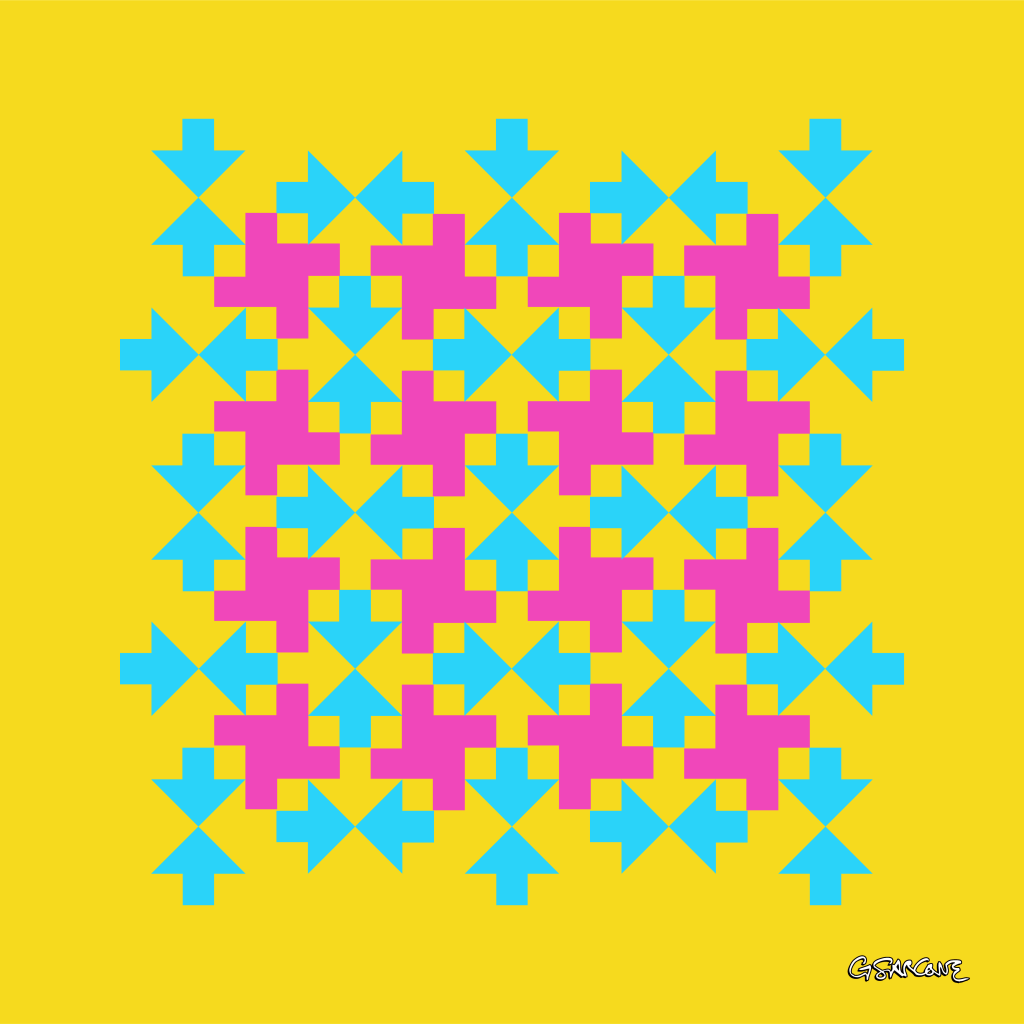
pattern with pinwheel shapes

Experiment 3:

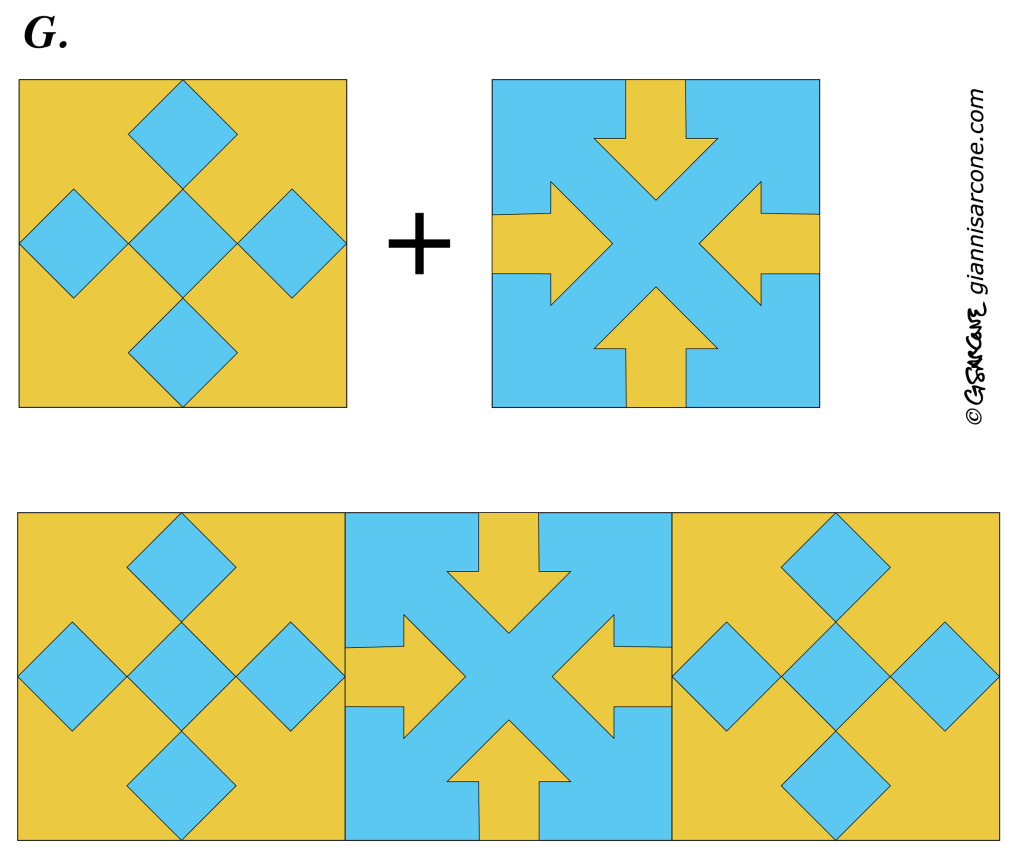
· Preparation & Assembly — Fig. G: Combine square tiles containing interior diamond arrangements with tiles featuring four inward- and four outward-pointing arrows formed by negative space. Arrange them alternately to create a checkerboard pattern.
The example below shows a 3 × 3 alternating checkerboard configuration that surprisingly reveals 52 arrows in total.
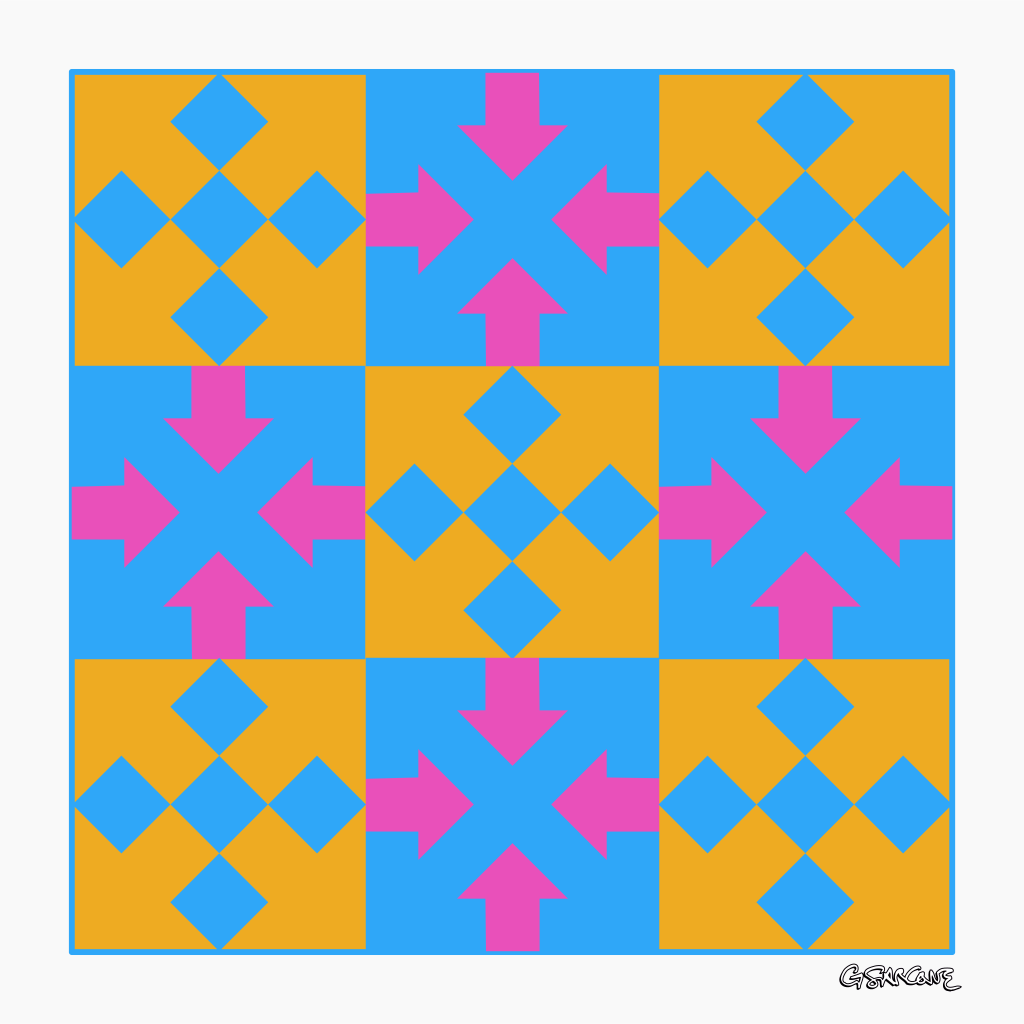
Variation: Here is a striking variation of the tile with four inward- and outward-pointing arrows. The inward arrows extend into continuous paths on a white background, creating the effect of interwoven arrowed ribbons.

Extra 3D Arrow Illusion

Let’s take a different direction from the experiments above and explore a 3D isometric illusion. This construction is inspired by classic impossible figures depicting ambiguous stacks of cubes, whose apparent number can change depending on how you interpret their spatial arrangement.

Start with a hexagonal boundary (Fig. 1) and overlay a triangular isometric grid (Fig. 2). Then draw six interlocking arrow shapes around a central point, folding their tails inward (Fig. 3).

Finally, use three colors to shade the isometric planes, or apply directional line hatching, to give the flat arrows a three-dimensional, interlocking appearance.
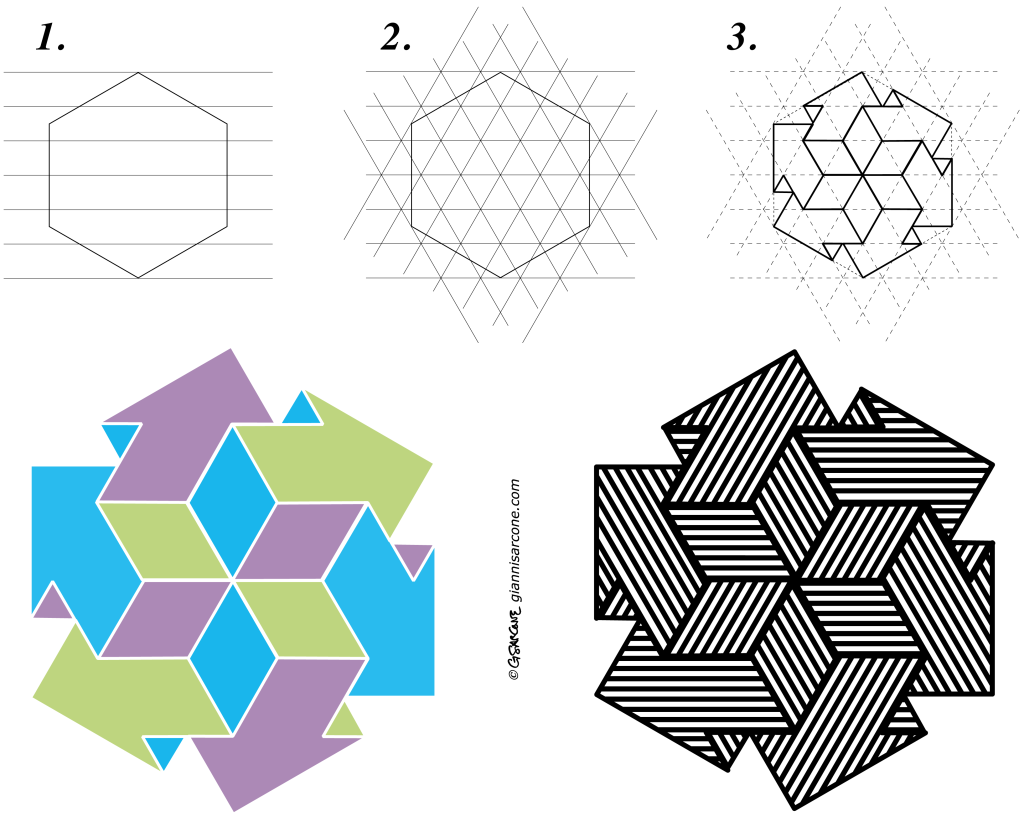
Curious about the mathematics behind these impossible 3D arrows? Math lovers can explore the geometry and construction 👉 here.

Ananke’s Die

A simple study in visual perception—an exploration of how a plain hexagon can evolve into the illusion of a cube. Through precise geometry and controlled form blending, static lines awaken into rhythm and volume, giving rise to a subtle sense of depth and movement.

Constructing the Illusion

Fig. A — The Base Shape
Start with a regular hexagon. Divide it into three equal diamond shapes (rhombuses)—these represent the three visible faces of the cube. Each diamond has four equal sides: two acute angles (60°) and two obtuse angles (120°). Together, they form the geometric foundation of the cube.

Fig. B — Building Volume with Shape Blends
In Illustrator, or any other vector software, use the Blend Tool to create a shape blend inside each diamond. Start with a small central circle and blend it toward the outer edge of the diamond. Adjust the number of blend steps to control how smooth or tight the transition appears. This process builds the cube’s apparent volume and visual tension. You’ll notice that the distance from corner to corner in the nested, diamond-like shapes is slightly greater than from side to side, creating subtle gaps that lead the eye to perceive an X across the surface.

Fig. C — Perspective and Transformation
Distort slightly the hexagon to set the three diamonds in perspective. This step transforms the flat figure into a die-like cube, giving it spatial depth and presence.

ananke cube

Enhancing the Optical Effect
Next, add horizontal background lines and some color, as shown in the two examples in the image. You can also adjust the illusion by making the visible faces of the die appear slightly concave, as in the figure on the right. This effect is created by shifting the concentric, nested diamond shapes slightly off-center—the position of the central ellipse determines whether the die appears concave or convex.

 two Ananke dice

Below is the finished stage of the work. Curiously, the cube appears to hover, slide, and even emit a faint blue glow—though it remains entirely black and motionless.
Ananke’s Die is a study I began in 2010, a continuing exploration of how repetitive lines and geometric precision can trick the mind into sensing motion and color where none exist.

Ananke die

You can get Ananke’s Die as a fine art print or canvas, available in different sizes and finishes.
👉 Buy it here

Why Ananke’s Die

I titled this work Ananke’s Die after Ananke, the Greek goddess of necessity and fate.
The cube, a symbol of structure, represents order and control. Yet the three visible faces that seem to define its volume are an illusion—shifting and unstable.
Under the viewer’s gaze, the shape changes, its meaning shifts, yet the form remains.
This illusory die shows the balance between order, perception, and destiny, reminding us that what we think we control often exists within the unpredictable interplay of vision and inevitability.

This image also triggers multiple associations in a loop: hexagon, cube, die, chance, illusion, order, fate, contradiction. These connections show how perception mixes stability and randomness, revealing that what we see is shaped as much by the mind as by reality.

Mystic Flying Bat

Mystic Flying Bat is a mixed-media artwork I created back in 2010. It was the starting point for a series of pieces in a similar style, some of which I screen-printed using different color palettes. With this work, I wanted to invite viewers to think about an intriguing question: What is movement?

What makes this kinoptic artwork special is the way it creates the illusion of motion. As you look at it, the black bat seems to flutter, expand, or shift. But here’s the fascinating part—if you stare at it long enough and then close your eyes, a white bat will appear in your mind!

Kinoptic designs, like this one, play with our perception, making still images feel alive. It’s all about the clever use of contrasting colors and the precise arrangement of shapes.

Curious about how to create something like this yourself? I’ve put together a tutorial you can check out.

If you’d like to own a print or canvas of Mystic Flying Bat, you can find them here.

Layering Up: A Creative Look at AI

Ever wondered how Convolutional Neural Networks (CNNs) process images? Imagine putting a photo through a pasta machine… TWICE! This creative experiment, inspired by artist Kensuke Koike, demonstrates how CNNs break down data into smaller, layered features, just like the pasta machine creates four clear images from a single input.

© Kensuke Koike

Globes within Spirals? (Optical Art Tutorial)

© Gianni A. Sarcone – redbubble.com

Are you seeing spirals? Look again, they’re actually concentric circles! This unique variation of the “Fraser spiral” plays tricks on your eyes by blending a regular line pattern (representing the circle’s circumference) with misaligned elements (the spheres with varying brightness).

Would you like to learn how to create this mesmerizing illusion? Follow my simple visual tutorial. If you have any ideas to further enhance this project, please don’t hesitate to reach out.

Continue Reading →